
1. 動画素材の取り込み
https://www.dashboard.whatmore.live/
メニュー「Home」
- ページ右上の
 「Add Media」 ボタンをクリック
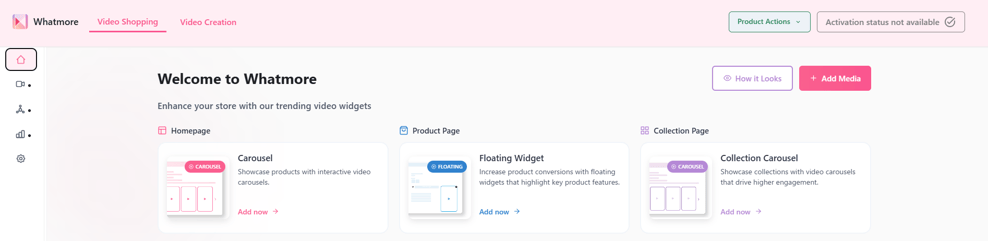
- 動画素材の取り込み方法を選択
- Instagram投稿から取り込み
- TikTok投稿から取り込み
- マニュアルアップロード
AまたはBの場合:
InstagramまたはTikTokの「ユーザーID」や、「動画投稿のURL」をキーに動画コンテンツの取り込みが可能です。
入力欄に上記を入力し、「Import」をクリックします。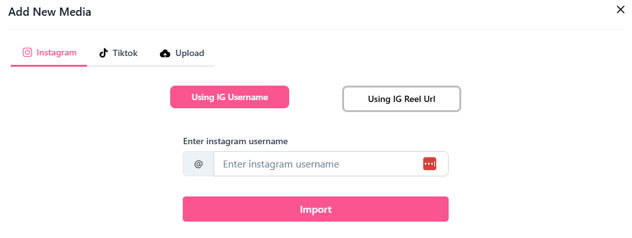
Cの場合:
「Upload」タブを開きます。
「Click to upload」をクリックし、PCに保存された動画からアップロードする動画を選択します。「Submit」ボタンをクリックして完了です。
2. 動画と商品情報の紐づけ
https://www.dashboard.whatmore.live/shopping
メニュー「Video Widgets」>「Video Gallery」
- 動画上の
 「Tag Products」ボタンクリック
動画に紐づける商品の、商品詳細ページURLを入力します。「Submit new products」をクリックし完了です。
それぞれの動画に対して、上記作業を繰り返します。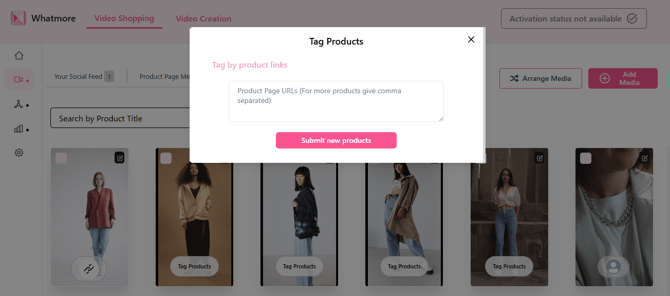
3. Whatmoreウィジェットの作成と設置
■ TOPページ
https://www.dashboard.whatmore.live/shopping/homepage
メニュー「Video Widgets」>「Home Page 」
- ウィジェットタイプを選択します。
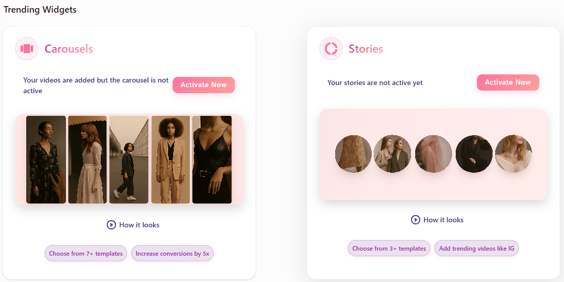
- (例)「Carousels」を選択した場合
「Coose template Type」下のプルダウンから、好みのテンプレートを選択します。 ボタンをクリックし、ウィジェット表示用コードをコピー。
カラーミーショップの管理画面にて、TOPページの任意の位置にコードを挿入します。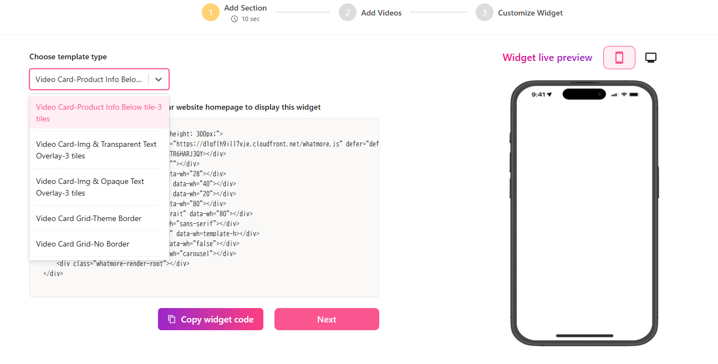
- 「Next」をクリックし、掲載するビデオを選択します。
- 「Next」をクリックし、ウィジェットのカラーやフォントなどのデザインを調整します。
■ 商品詳細ページ(PDP)
https://www.dashboard.whatmore.live/shopping/product-pages
メニュー「Video Widgets」>「Product Pages (PDP)」
- ウィジェットタイプを選択し、専用コードを商品詳細ページの任意の位置に設置します。
例:「カートへ追加」ボタン付近
※Floating Card(フローティングカード)は、ページをスクロール時に追従する形式で動画表示が可能です。
■ コレクションページ
https://www.dashboard.whatmore.live/shopping/collection-pages
メニュー「Video Widgets」>「Collection Pages 」
■ その他ページ
https://www.dashboard.whatmore.live/shopping/collection-pages
メニュー「Video Widgets」>「Pages 」
4. コンバージョンタグの設置
注文完了画面(サンクスページ)にコンバージョンタグを設置することで、動画視聴者のコンバージョントラッキングが可能になります。
※カラーミーショップ指定の置き換え文字を使用します。
パラメーター
-
order_id (string): 注文の一意な識別子。
-
order_items (array): 注文に含まれる商品のリスト。各項目には以下が含まれます:
-
product_id (string): 商品の一意な識別子。
-
price (string): 商品の価格。
-
quantity (number): 購入数量。
-
currency (string): 通貨コード (例: 'USD')。
-
-
token (string): APIアクセス用の認証トークン。Whatmoreダッシュボードで利用可能です。
-
store_id (string): Whatmoreのシステムにおける、ストアの一意な識別子。
以下のJavaScript関数を実装して、注文追跡データをWhatmoreのAPIに送信してください。
ーーー
function sendOrderTrackingRequest(order_id, order_items, token, store_id) { const url = `https://api.whatmore.live/external-shop-order-tracking/private?store_id=${store_id}` const headers = { 'Content-Type': 'application/json', 'Authorization': `Bearer ${token}` }; const requestBody = { "order_id": order_id, "order_items": order_items, "whatmore_video_view": localStorage._whatmore_viewed_products? localStorage._whatmore_viewed_products : "[]", "whatmore_add_to_cart": localStorage._whatmore_add_to_cart_products? localStorage._whatmore_add_to_cart_products : "[]" }; fetch(url, { method: 'POST', headers: headers, body: JSON.stringify(requestBody) }) .then(response => { if (response.ok) { console.log('Order tracking request sent successfully'); } else { console.error(`Error: ${response.status} - ${response.statusText}`); } }) .catch(error => { console.error('Error:', error); }); }
ーーー
実装手順
- 関数の組み込み: sendOrderTrackingRequest 関数を、ウェブサイトのJavaScriptコード内に配置してください。
- 関数の呼び出し: 注文が正常に完了した後、適切なパラメータ(引数)を設定してこの関数を実行してください。
例:
const orderId = 'your_order_id';const orderItems = [ { product_id: 'product_id_1', price: '10.99', quantity: 2, currency: 'USD' }, { product_id: 'product_id_2', price: '19.99', quantity: 1, currency: 'USD' }];const token = "<store_token>"const store_id = "<whatmore_store_id>"sendOrderTrackingRequest(orderId, orderItems, token, store_id)